Arm Paaaaaaar-tay!

If you've been checking out some of my posts earlier this month, you've probably heard me mention the Arm Party, as hosted by {yellow heart art} and {much love, illy}.

Over the past month or so 100 bloggers paired up, swapped info, and got crafty! We've been living in the grade-school throw-back memories of when friendship bracelets were the bomb.

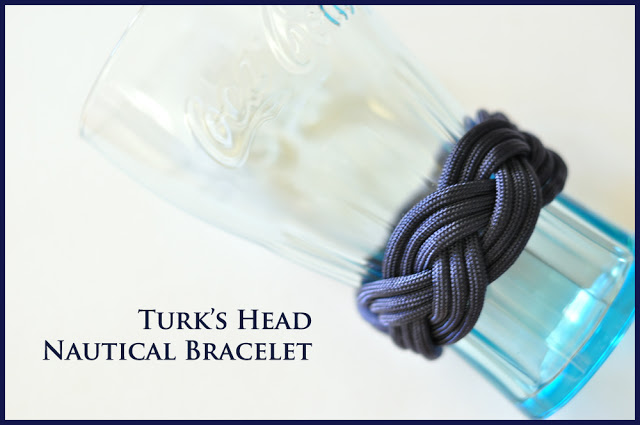
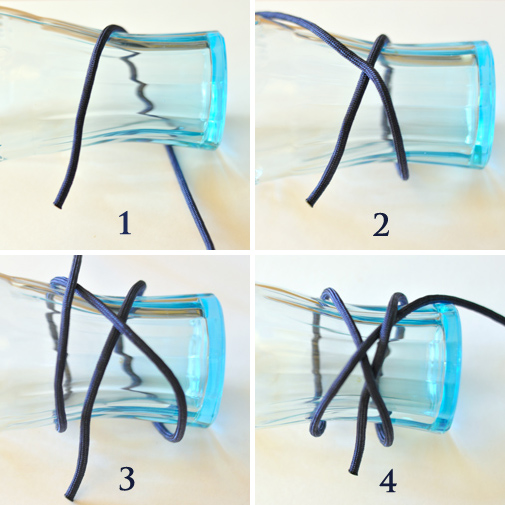
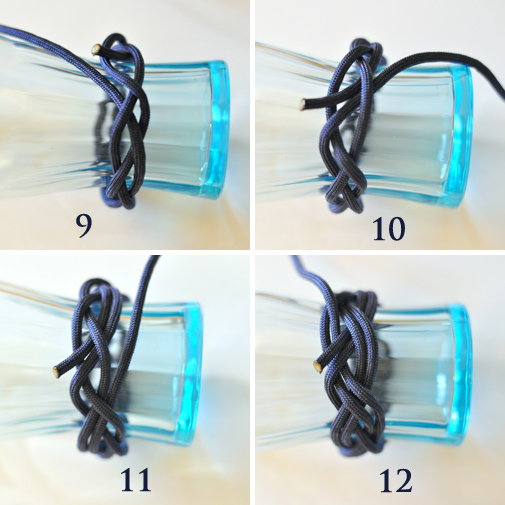
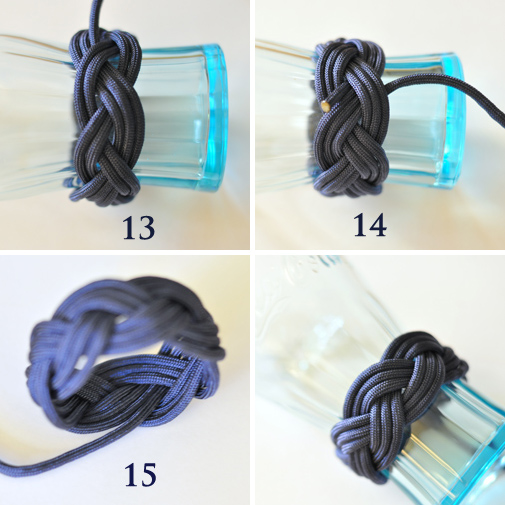
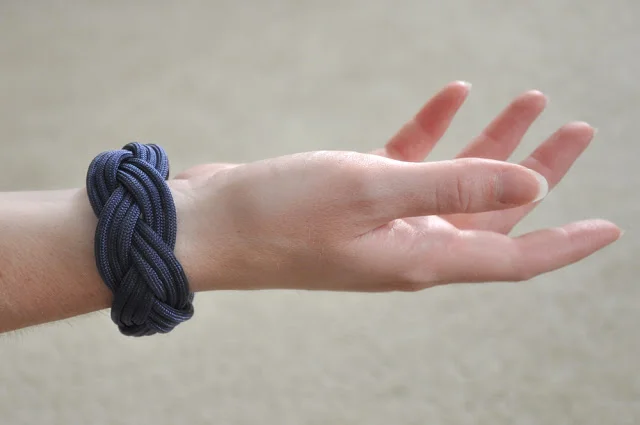
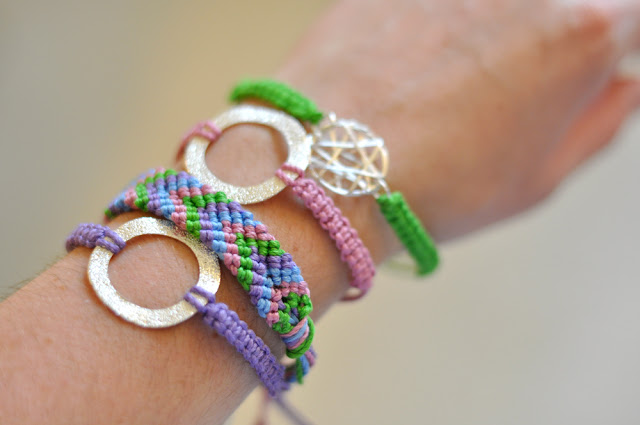
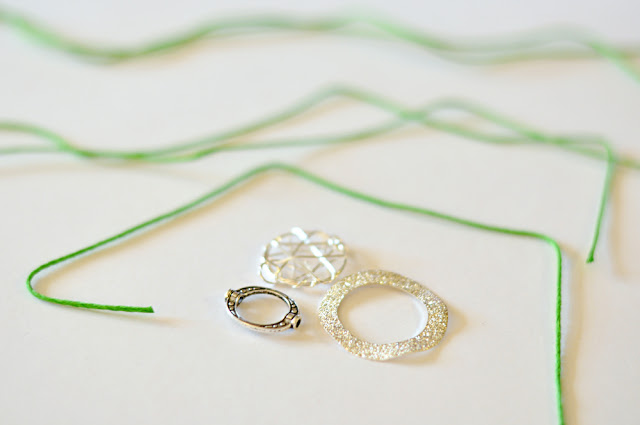
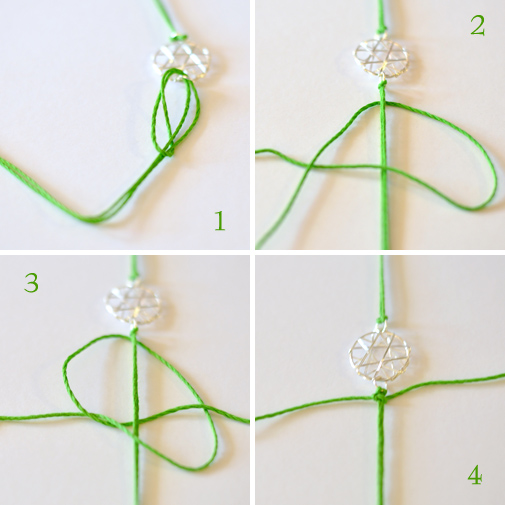
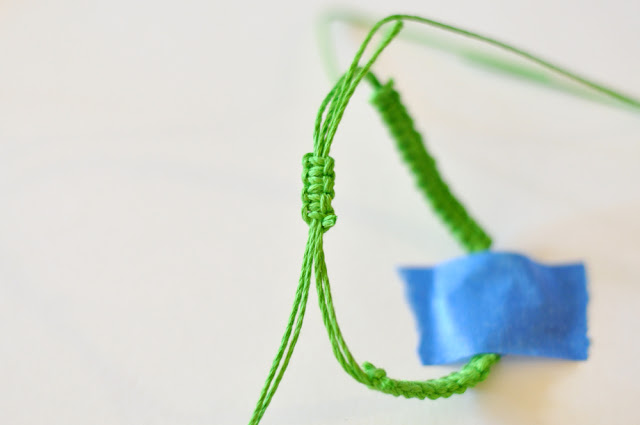
While I was busy making {macrame bracelets} and {nautical Turk's Heads} for my swappin' buddy Ashley (her adorable blog is {the sweet ashley life}... check it out!), she sent me some of her own crafty bracelets. Now that they've arrived safe and sound in my mailbox, I'd love to share her creations with you!

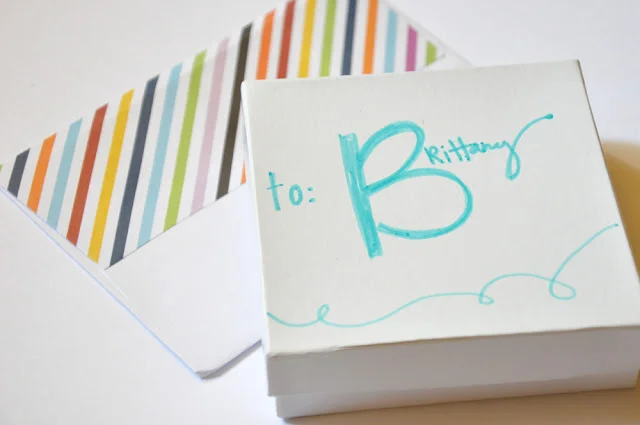
How cute is that envelope? :) She sent along a little card that said she saw from my blog that I am an outdoorsy person (heh heh yup!) and so she tried to make the bracelets in earth tones to match. I was so touched by her perceptive thoughtfulness! :)

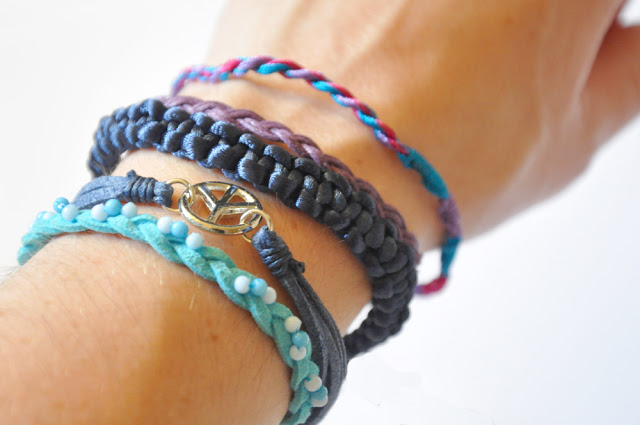
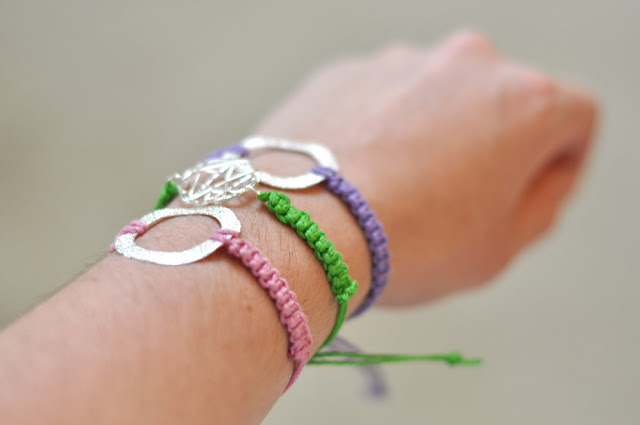
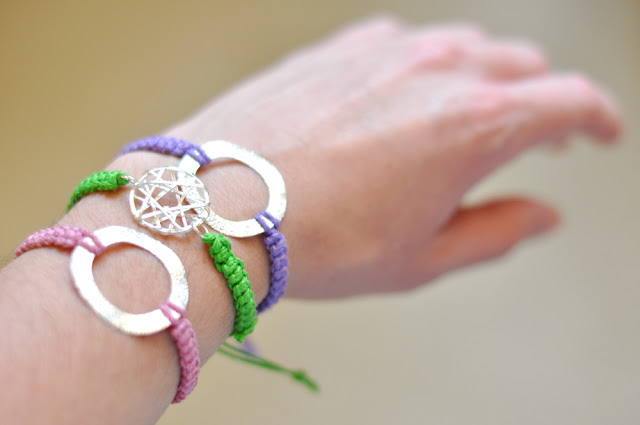
Aren't they just lovely? I just love the charm bracelet and the turquoise one with the beads braided in... I stared at that thing for 20 minutes just trying to figure out how she did it. So clever! :)

By the way, you can see her post about the bracelets I made for her {here}.

Thanks, Ashley! And thanks to Leonora and Illy for putting together such a fun Arm Party! We're linking up all the crafty bracelet-ness today, so check out this link to see the rest of the DIY awesomeness:

DIY: Nautical Turk's Head Bracelet

You may have heard me mention in previous blog posts that I used to be a sailor. Well, I suppose I am still a sailor, I just haven't had much of a chance to go sailing lately.

When I lived on the east coast I was pretty active in a local sail racing group; I often crewed aboard 18 foot sloops known as Buccaneers (fitting, eh?), and I even helped my skipper take second place at the national BNAC regatta in 2010 (woot woot!)

But you may also know that I used to be a deckhand aboard a tall ship. I lived, worked, and sailed aboard a 145' ship for six months, and though it was some of the toughest, grittiest work I have done in my life (plus lots of puking), it was also some of the most rewarding work I have ever done. And the most beautiful. There's nothing quite like living aboard a wandering vessel that spends most of its days governed by the wind.

Sailing is an art that requires an intimate knowledge of knots. You use them constantly while aboard, and most of the time a correctly tied knot will save your life, so you have to know how to tie them correctly (and quickly). On the other hand, there are some lovely knots that are merely decorative, and the Turk's Head is one of my favorites. Most sailors have their own intricate versions of these tied around their ankles or wrists, sun bleached and salty from years of wear.

While doing the arm party bracelet swap with Ashley this month, I had some fun reminiscing on my ol' sailing days and whipping up a nautical bracelet to send via snail mail.

Here's the tutorial so you can all feel like salty pirates, too!

Supplies needed:

6-10 feet Paracord (or about 10 times the diameter of your wrist. I bought a 16 foot length and used about half of it)

A round object slightly larger than the size of your wrist (I used a coke glass)

Scissors

Craft glue

Don't cut your paracord; I bought mine in a length of 16 feet and cut it to size after I had made the bracelet. This allows you a little room for mistakes.

Now, this is a somewhat complicated tutorial to explain through pictures. I'll do my best, but I also recommend checking out {this site} because it animates the process for you and makes it a little easier to follow along. I'm not that tech-savvy, so my photos are all stills. Sorry, folks. ;)

Also, a couple quick notes: first, make sure you're tying this knot pretty loosely. As the knot progresses, it will get tighter and tighter, so make sure you have enough slack to work with!

Second, to distinguish what part of the cord I'm talking about, I'm going to use some rope-tying terms. Are you ready?

Standing end will refer to the end of the cord that is standing still throughout this process, and working end will refer to the end of the cord that is being actively used to make the knot. Make sense? Good.

1. Drape one end of your cord around the top of your round object (I used a drinking glass), leaving a tail on the top. This will be your standing end. Wrap the working end around the back of the glass.

2. Wrap the working end up and to the left of the standing end, creating an X.

3. Wrap the working end behind the glass and over the top left section of your "X."

4. Now tuck the working end underneath the top right section of your "X."

With me so far? Good.

5. Now spin your glass a little toward you so the bitter end is almost tucked underneath and you can see more of your cord. Here's the trick: criss-cross the top left and right sections of your X to create a new X, with the top left part of the X now on the top right.

6. Weave your working end over the top right of your new X and under the top left of your new X.

7. Rotate the glass toward you again a little more. You should see another X where the cord has overlapped itself. Weave your working end over the top left of the X and under the top right.

8. Rotate your glass a little more. You should now be able to see your standing end again! Once more with your fingers, criss-cross the two strands of cord to create a new X.

9. Weave your working end over the right side of the X and under the left side. Now you should be back to your standing end. Great job! The hard part is over!

10. From here, you just have to follow what you have already done. Weave your working end alongside your standing end, doing the same over, under weave that you did the first time.

11. When you arrive back at your standing end, you should see that one of your strands has doubled and you are now preparing to go around another time, following a different strand of braid.

12. Follow the cord around again, over under over under, until you arrive back at your standing end. Now you should see your braid is doubled. You can stop here if you want, but I like going around another time for a triple braid.

13. Once again, weave your working end around, following the strands you braided before.

14. When you arrive back at your standing end, you're finished!

15. To hide the ends, carefully slide your turk's head knot off the glass and tuck the ends underneath the bracelet. Cut the excess off with scissors and use craft glue to secure the ends out of sight.

You're all finished! Now you should be able to slip the bracelet on and you shouldn't see any ends sticking out -- it looks like an infinite celtic knot!

You could also use this knot to make awesome-looking cozies for your glasses and mugs, and impress your friends. :)

Wahclella Falls.... Again!

Wahclella Falls is one of my very favorite waterfalls in the Columbia Gorge. I've been there fifty five times already this year.

Just kidding. This is a total exaggeration, folks. I've really only done this hike six times in two years, but there are hundreds of hikes to do in the Portland area, and I try not to repeat myself, so hitting any of them more than once (much less six times!) is really something. In fact, you've already seen me post about this hike twice. Here and here. And guess what? You're about to see me post about it again. Can we say it together? HOORAY! (Sarcasm?)

This hike is beeeeautiful and only 2 miles long, making it the perfect afternoon jaunt with a dash of gorgeousness. We went on a hot, steamy day, the kind that makes you not want to hike very far. But the best thing about this waterfall is that it's tucked into a mossy, fecund gorge wrapped in high stone walls. As soon as you turn the bend into this magical place, you get a blast of cold, water-soaked air in your face. Natural air conditioning. Love it. I could seriously sit here all day.

DIY: Macrame Bracelets

Hey lovely readers!  Summer is in full-swing, and what better way to enjoy it than with a little summertime reminiscing, am I right??

When I was as a girl in the hot hot 100+ day summers of the south, I loved spending my days playing in the pool, climbing trees, painting my fingernails, and making pretty braided bracelets with all my friends. Friendship bracelets were all the rage, remember? I must have made 485592696 keychains and anklets with hemp and embroidery thread between the ages of 10 and 13.

It's been a while since I've made hemp bracelets, but a few weeks ago I read a post on one of my favorite blogs, {yellow heart art}, and knew I had to jump back on that bracelet bandwagon! She and another blogger, {much love, illy}, decided to organize a summertime "arm party." This party involved bloggers signing up, getting partnered up, and making each other summer bracelets via care packages. Something like 150 people got back to their childhood roots, wove themselves some rockin' bling, and mailed it to someone else across the country.

Since this has been so fun, I decided to share the love and give you a tutorial of one of the bracelets I made. This particular knot I remember fondly as a child (some things stick with you forever) but I was happy to find instructions for the sliding closure knot (clever!) via {honestly, wtf}!

So without further ado.... let's begin your own arm party!

Supplies:

2 lengths of 30" embroidery thread

2 lengths of 20" embroidery thread

1 length of 10" embroidery thread

Scissors

Circular charm

Cut your pieces of embroidery thread to length. You'll need some kind of circular charm to be the center of your bracelet. The embroidery thread needs to form a knot around it, so the charm should be thin enough to accommodate this.

1. Fold your 20" piece of thread in half and loop it through the charm, making a knot. Do this with the other 20" piece on the other side.

2. Find the center of your 30" piece of thread and put it behind the 20" piece, making a backwards "4" with the left end overlapping the right end.

3. Tuck the left end under your 20" thread and through the loop of the "4" you created, completing the knot.

4. Pull the knot tight and slide to the top.

5. Now repeat steps 2-4, but backwards. Create your "4" on the left side this time, with the right end overlapping the left end of the thread.

6. Tuck the right end under the 20" thread and through the loop of your "4."

7. Pull knot tight.

8. Continue alternating knots down your embroidery thread in this fashion until you have a suitable length. It should wrap about half-way around your wrist. Remember that you need to leave room to make the sliding closure at the back.

Tie a double knot with your loose ends and trim the excess.

When you have finished your macrame knots, tape your charm to the table to hold the bracelet flat, then overlap the loose ends of your original 20" thread pieces (there should be four of them) and use your cut scraps to tie them in place.

With your remaining 10" piece of thread, find the center and loop it behind the back of your bracelet, creating the knot as in steps 2-8. 

Repeat this knot several more times until you have a good sized closure (about 1/2" or so).

Tie a double knot with your loose ends and trim them off. Then try on your bracelet for size to make sure you can open and close it with enough "wiggle" room. Tie knots in the ends of your 20" pieces and trim off the ends.

Voila! Your very own macrame bracelets!

By the way, it's really hard to take pictures of your own wrist with a 50mm camera lens. There's just no graceful way to get your arm and your eye far enough away from each other to get your wrist in the photo. Awkwaaaard.