Tubing!

My very favorite weather is cold and sunny. There's something magical about a crisp breeze, a sapphire sky, and the sun glittering off freshly fallen snow. I love a good snow day, and I am obsessed with mountains (in case you hadn't noticed) so playing on Mt Hood in the winter is a wonderful treat for me, especially when the weather is fair.

Tanner, tragically, is not a big fan of skiing (or snow sports in general) but I finally discovered one pastime that got him motivated to go to the mountain with me: tubing!

I don't honestly think I've been tubing/sledding since I was quite young. My sister and I used to sled all the time as kids, but on the east coast, snow is rare and I didn't get much of a chance to enjoy it in my college years.

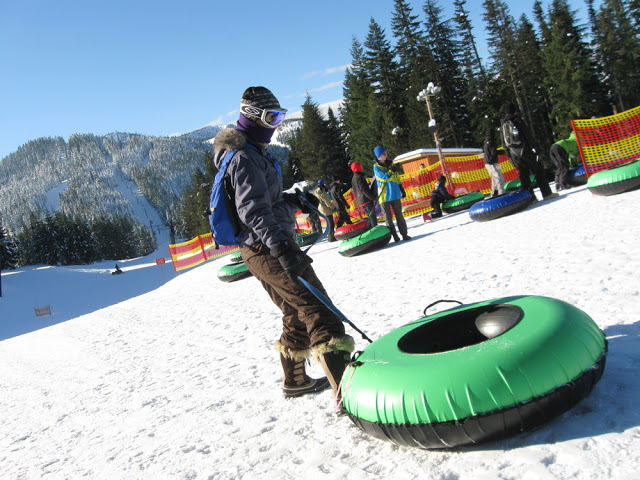
So, last weekend Tanner and I hauled ourselves up to the mountain, jumped into inflatable tubes down a slick, icy hill, and you know what we discovered? Tubing is freaking scary.

I mean it. As a kid, the thrill of the ride completely overshadows the fact that you might hit something and die at any moment. As an adult, suddenly you have 100 more pounds pulling you down the hill, and a tame joy ride turns into the Cool Runnings Olympic luge of DEATH.

I'm not saying I didn't enjoy it. Because, damn, it was fun. But I'd be lying if I said there weren't moments where I feared for my life.

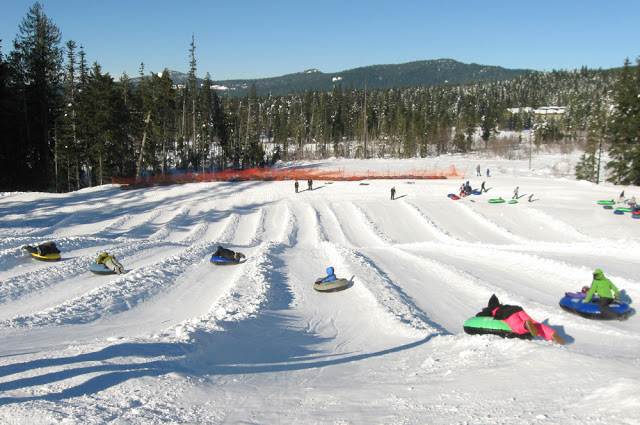
After tubing the kiddie hill for a while, Tanner discovered that there was a hidden "epic upper hill" where few ventured... it was a 45 degree slope with moguls and chunks of iceburgs in the chute (just for fun.) The tubing attendant told us, "two rules: you have to lie down on your stomach, and don't put your feet down before you get to the end." Screw that. If I'm going face-first down a vertical drop, my feet are most certainly going to be acting as brakes the whole way down the ice.

I made it through two runs of that before retiring back to the kiddie hill. (Sorry, you thrill-seekers. I'm not a roller-coaster fan, either.)

At the end of the day Tanner and I finally discovered the joy of two-person tubes. By this time I was enjoying the speed of my one-person tube, and was even trying to race unsuspecting six year olds down the mountain. (I was totally winning.) A two-person tube adds extra weight to the ride, which equals more speed down the hill, and many small children left in the proverbial dust.

At any rate, for $25 at Ski Bowl, it was an afternoon well spent.

Forget lugging your tube up the hill every time. This is 2013, bitches. I'm taking the snow conveyor belt!

Epic tubing hill. (I'm watching from a safe distance.)

Tanner's the one behind the small child. You know... the one dressed like a ninja.

Tis the Season for... Valentine's Day Cards!

Hi lovely readers! Did everyone have a good holiday season? I've missed my time away from the blog, but it was delightful to have free moments to soak up wintertime in the mountains with friends. Now that I'm back and the New Year is upon us (how are everyone's resolutions coming along?) I've been spending my free time putting some long working hours into my shop. I know it's only January, but Valentine's Day will soon be upon us, and as a shop that sells greeting cards, Valentine's Day is a big holiday for me!

My grand opening last year was actually after Valentine's Day, so this is my first big-big holiday and I'm super pumped!! December rounded out the best month I've had all year, finishing up 2012 with a bang and making me excited for the potential of 2013.

Already my shop is getting flooded with "hearts" and purchases as customers key up for the season. Making I love you cards is one of my very favorite genres, too, so I'm practically giddy with greeting-card-love lately. I've been having the best time drawing and posting new designs these past few weeks!

Other new changes are rolling along, too, behind the scenes. I learn more and more as I go along, so I've been streamlining my shipping process, adding fun new stamps and colorful tapes to my arsenal, ordering newly designed business cards, changing up my logo to look more "branded" (now my stamps, cards and shop banner look the same!), organizing my work space to make it more user-friendly, and trying to find a happy medium with shipping rates. A special perk I just rolled out is that additional card purchases don't cost anything extra in shipping, so you can purchase up to 6 cards for just $1.70, and any purchase over 4 cards is automatically upgraded with delivery confirmation! It's a great reason to stock up on your favorites.

If you missed the roll out of my new Valentines Day cards via Facebook last week, I'm going to share them with you today. There's a good dash of silly, sweet, scandalous, and (as always) slightly geeky treats for everyone. I hope you like! See them all {here.}

Happy New Year and an (early) Happy Valentine's Day! :)

P.S. - I love taking custom orders and suggestions, so if there's something you want to see, let me know! I'm currently working on a Star Wars happy birthday card at the request of a customer, so be on the lookout for that posting! It's definitely giggle-worthy.

Gingersnap Cookies

Gingerbread cookies are Santa's favorite cookies. And mine, too. I never seem to remember how much I love them until this time of year rolls around and I get a craving for them... something about the spicy bite of cloves and ginger, the sweetness of the cinnamon and the bitterness of the molasses is what does me in completely.

Sometimes inspiration hits at odd moments. I was craving gingersnaps at 10 pm, so that's when I made them. Fortunately, this recipe is very quick and easy; I was putting the second batch of cookies in the oven at the same time that I was polishing off the first batch. Then I realized that snacking on gingersnaps is not like snacking on popcorn, and perhaps I should not have six of them at a time.

{gingersnap cookies}

Ingredients:

3/4 cup butter (room temp)
1/2 cup brown sugar
1/2 cup white sugar
1/4 cup molasses
1 large egg
1/2 tsp vanilla extract
2 cups flour
1/2 tsp baking soda
1/4 tsp salt
1 1/2 tsp cinnamon
2 tsp ground ginger
1/2 tsp ground cloves
Garnish: 1 cup white sugar

...aaaaand Santa's little helper. :)

In a large bowl, cream the butter and brown/white sugars together until light and fluffy. Since Tanner likes using power tools, I gave him our hand mixer and told him to have at it.

Once creamy, slowly add in the egg, vanilla, and molasses.

In a separate bowl, mix the flour, baking soda, salt, cinnamon, cloves and ginger. Add the dry mixture to the butter mixture and mix.

Chill the mixture in the fridge for about 30 minutes.

Preheat the oven to 350 degrees and line two cookie sheets with parchment paper. Scoop out small balls of cookie dough and roll in white sugar to coat. Place cookies on cookie sheet and flatten with your hand or the bottom of a jar. (I like imperfect cookies, so mine weren't very symmetrical.)

Bake for 12-15 minutes or until dry and firm on top. The longer they bake, the crisper the gingersnap will be. I have an overly manic oven and a taste for soft-centered cookies, so I only baked mine for 11 minutes. Warm, spicy goodness.

Tanner kept trying to sneak cookies when I wasn't looking, so I made him stand still to take some photos. This didn't go over very well. In fact, the conversation went something like this:

Me: "Ok, take a step back. A little further. Now hold the cookie out into the light. More to the left. No, don't eat the cookie. More to the left. A little more. Ok, hold it right there... no, you can't eat the cookie. Tanner. Leave the cookie alone. You're supposed to hold it still so I can take a picture. Don't eat the cookie! TANNER, STOP EATING THE COOKIE."

Verdict? Delicious.

DIY: Holiday Gift Boxes

Do you have an ever-growing stack of holiday cards you collect each year, or is that just me? It's hard to know what to do with them all, so here's a quick and easy DIY craft that recycles your old holiday cards into tiny origami gift boxes that you can use the next year for stocking stuffers!

{holiday card gift boxes}

Materials needed:

Holiday cards
Scissors
Tape (optional)

You'll need the front and back of the greeting card for these boxes (to make the top and bottom of the box). As a tip: larger cards are easier to fold and make bigger boxes, so shy away from the smaller sized cards if you get frustrated by attempting tiny origami folds (like me).

1. Cut the card down the middle to separate the front from the back. The folds are the same for both halves, but this demo will be for the top of the box.

2. Cut your card so that it is a perfect square. (When you're making the bottom of your box, you will need to remember to make the square slightly smaller)

3. Flip your card over so that the pattern is facing down (in this case, I wanted the polar bear and penguin on the top of the box. I'm not sure why this card happens to have a weird design on the back, too!)

4. Fold your card in half right-to-left and reopen.

5. Now fold your square in half top-to-bottom.

6. When you reopen the square, you should see the crease marks create a "plus" sign on your card.

7. Fold each of your corners into the center where they should line up. (Sorry, in this picture I rotated the card a little... I hope that doesn't confuse anyone!)

8. With your corners still folded to the middle, now fold the top and bottom of your square to the center where they should line up.

9. Unfold the last step you just did and do the same thing the other direction: bring your left and right sides of your square to the middle.

10. Unfold everything except two of your corners, as shown.

11. Fold in the left and right halves along your crease lines to make a "skinny tie" shape.

12. Lift up the sides you just folded down to create the sides of your box.

13. Pinch your fingers into the top creases so that the side of the box starts to collapse into itself.

14. Flip the fold up and over...

15. ... so that it tucks into place and holds up the side of the box.

16. Do the same thing to the other side of the box. If the flaps keep popping up, use a bit of tape to secure it in place.

Now you should have one half of a tiny holiday box! Make the bottom of your box the same way (but cut your square slightly smaller) and fit the two pieces together to make a closed box. Fill with candies, jewelry, or other small gifts to put in Advent Calendars, stockings, or under the tree!

Enjoy!