Homemade Hot Cocoa

I love the holiday season. And I'm not talking "love" like the cliche "Christmas is my favorite holiday" drivel. No, I'm talking love like everything-about-the-holidays-makes-me-mushy-inside love. As in, I love the things that most people just hate about the holidays. 

- I love the gaudy, ostentatious holiday decorations that show up in the big department stores every year (it makes me feel like I live in a Christmas movie set in New York)
- I love the cheesy Christmas songs on the radio that start the day after Thanksgiving (yes, I'm that person)
- I love watching holiday movies over and over (I never get tired of The Santa Clause and While You Were Sleeping)
- I love seeing Santa Claus at the mall in his giant North Pole house with a huge line of kids all waiting to start screaming the second they sit in his lap.
- I love untangling Christmas lights and dragging out the boxes of Christmas decorations and I love leaving my tree up until mid-January... or late January... or March.
- I love the cold dump of snow and everyone bundled up running around doing their Christmas shopping last-minute.
- I love driving around town looking at the overblown Christmas lights and those horrific lawn decorations that seem to show up in every neighborhood.
- I love Christmas carolers and hand bell choirs.
- I love that jittery, excited feeling that has been with me since I was very small and still thought that a big jolly man in a red suit was going to magically leave me presents on Christmas Eve. Sometimes I still believe that.
- I love the overstuffed church pews on Christmas Eve.
- I love the foods that are somehow only acceptable once a year. Pumpkin pie, peppermint ice cream, cranberry sauce, baked yams, egg nog, gingerbread.
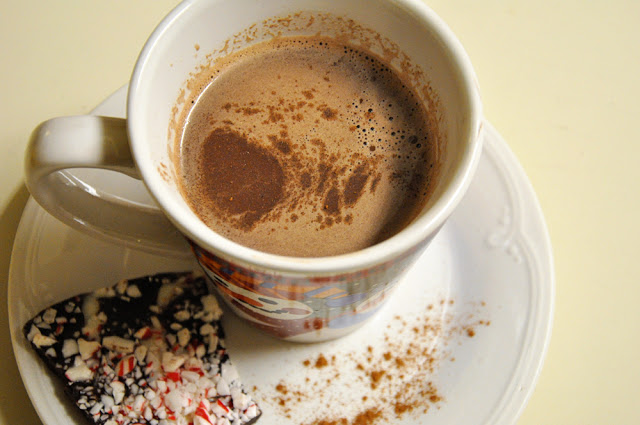
- and I love hot cocoa, even if every, every, every time I drink it, it scorches my tongue and I can't taste anything after the first sip.

After spending a long weekend at the mall people-watching (like a crazy person... who goes to the mall on purpose this time of year not to shop, except me?) I decided I needed to round-out my dose of Christmas cheer with a warm, chocolaty beverage.

{hot cocoa}

Ingredients:

1/4 cup cocoa powder
1/3 cup sugar
1/4 cup chocolate chips
3 cups milk
1 tsp vanilla extract
Cinnamon, to taste

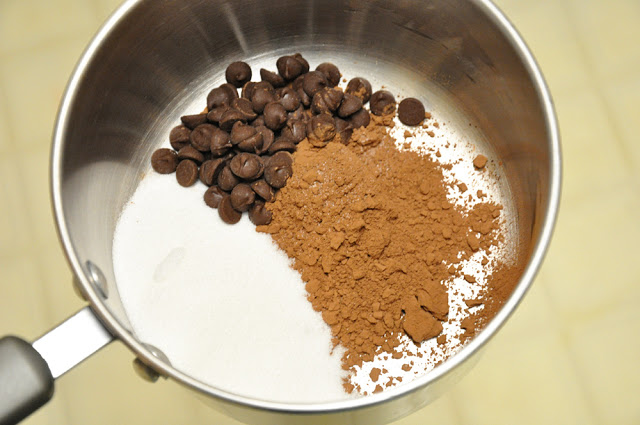
Mix the cocoa powder and sugar together in a small pot. Add milk and chocolate chips and heat over medium heat, stirring occasionally, until chocolate chips have melted and consistency thickens slightly. Add vanilla and serve. I sprinkle a dash of cinnamon on top of mine.

Makes three-four servings.

True to form, I burnt my tongue the first sip I took, but somehow managed to enjoy the rich, chocolate taste to the last drop. Delicious.

How to Photograph a Christmas Tree

Today's post contains a few tips on how to take pictures of Christmas trees. I don't claim to be an expert at photography, so these are just the things I have discovered messing around with my camera. You may have some helpful tips of your own, so feel free to share!

{tips on how to photograph a christmas tree}

Your first step is going to be setting up a tripod for your camera. Since these are low-light shots, it's imperative that you have a stable base on which to place your camera. Otherwise you're going to be frustrated by photo blurriness. If you don't have a tripod, consider using a table and some stacked boxes to get your camera to the height you want. You'll also need some kind of remote to hit the shutter, or just put your camera on a timer when shooting (otherwise your finger hitting the shutter button will shake the camera and ruin your nice, stable setup)

You'll also need a wider lens on your camera if you want to get the whole tree in one shot. I have a Nikon D90 and used my 18-105 zoom lens for these shots, mostly with the zoom at 18mm. The tripod I use is the Manfrotto compact MKC3-H01. I love it: it packs up super tiny so I can take it on hikes with me, but is sturdy enough to hold my heavy camera and lenses.

Once you have your setup ready, let's play with your camera settings. You'll want to be in manual mode so you can adjust both aperture and shutter speed.

There are a few ways you can do this. To get the lovely "blown out" Christmas lights look, here are some general guidelines of how to set up your camera:

Shutter speed: 3"
Aperture: F/5.6
ISO: 1000
White balance: Tungsten (or Kelvin 2500)

You may not have these exact numbers; basically you want to put your aperture to a low number (ie: a low aperture number = a "wider" aperture and more light let in while shooting), your shutter speed to something slower (I set mine to 3 seconds), and your ISO to something on the higher end (a higher number will make the photo grainier, but if you have a very dark room, this may be a necessary adjustment).

(Ignore the ISO, shutter speed and aperture number in this demo, I know it says 1600, 8" and f/16... we'll get to that in a minute).

As you can see from your light meter, your camera is going to think that you're taking a photo that has the highlights really blown out. But that's what we want, so ignore the light meter and keep checking your histogram, instead: it will be more accurate.

As for white balance, I took these shots after dark, where the only light in the room was coming from the tree. Christmas lights, unless you buy the fancy new LED kind, are just tiny Tungsten lights. This is a good place to start when setting your white balance. However, my lights still were giving off a fairly orangey glow when I used the Tungsten setting:

I found what worked better was using the Kelvin setting (usually a "K" on your white balance: see above photo) and setting it to the lowest number. For me it was 2500. For those of you who don't know how the K setting works, it's basically the degree rating for different types of lighting.

For example, candlelight is about 1800 degrees, tungsten (indoor) lights usually burn about 3000 degrees, fluorescent lights at 4000 degrees, daylight is 5500 degrees, and shade in daylight is 7500 degrees. When I set the white balance to the lowest 2500 degree, the picture came out a little less "orange":

Obviously it's still a little tinted because the colors of the Christmas lights are mostly red and orange. If you have white Christmas lights, you should have a cleaner photo, but you'll also need to adjust your aperture, ISO and shutter speed to let in less light since white lights are much brighter.

Another option for shooting Christmas tree lights is to go for that "sparkly" look. The trick to achieving this is to have your aperture be very small: ie, set it to f/16. To compensate for such little light let in here, you'll need to have a much slower shutter speed and higher ISO. I changed mine to 8 seconds and 1600.

If you look closely, you can see that each Christmas light has a "star burst" around it, making the lights look more sparkly. You can choose whether you like the look of the tree this way, or the overblown glowing tree above. Feel free to play around with your settings until you find something you like!

I hope this tutorial helped - let me know if you have any questions, comments, or suggestions on how you like to photograph your Christmas tree!

Letter Block Christmas Tree

The credit for this little block tree goes entirely to my mom. We've had one of these decorations in our house for as long as I can remember: my mom used to make dozens of them when I was younger, and I remember several different variations living on our dining room table at one time or another.

My sister and I loved these trees so much we even came up with a game that we played every year at Christmas-time: the tree was our dinnertime centerpiece as we sat across from each other, and while we ate we would secretly pick out a small figurine on our side of the tree. Then we would alternate asking each other yes or no questions to try and figure out which figurine the other one had picked.

Is your guy sitting down?
Is he holding something?
Does he have feet?
Is he wearing red?
Is he wearing a hat?

The figurines, being mostly Santa Clauses and snowmen, were alike enough that each question didn't immediately give it away. When we thought we had enough clues at our disposal, we spun the tree around and tried to find the figurine that the other girl had chosen.

This was a staple of our Christmases for many years, and as new trees circulated through each holiday season, we were never short on new figurines with which to play the game.

The construction of this decoration is fairly simple. You'll need some colorful letter blocks, hot glue, and small Christmas figurines (or whatever holiday/ theme you prefer). Generally you can find these figurines in craft stores: little ornaments work well once you clip off the string at the top.

Assemble the bottom row of blocks in a circle. You can make them any size you like; my tree has eleven blocks as its base. Stack a circle of nine blocks on top of those, gluing them down with hot glue in between the spaces of the blocks below. Continue in this fashion until you have a single block at the top.

Decorate your completed tree with the small figurines glued to each of the open blocks. You may even glue flat decorations onto the sides of the blocks, if you choose.

I hope this tree makes its way into your holiday traditions as it has done mine.

And thanks, mom, for being my very first art/crafty idol and inspiration through the years. (Although we can pretend those puff-paint shirts from 1985 never happened...)

How to Choose a Christmas Tree

This has been a long week for me, mostly because I've had to wait to put up Christmas decorations. It's been, like... torturous.

Usually the day after Thanksgiving, I am in my slippers and surrounded by boxes from the storage unit, the Christmas music blaring. The house gets decked in lights and ornaments and a little nativity scene.

But this time I held off because Tanner said we're going to get a real Christmas tree this year. Usually this is a treat reserved for being at home with my family (Christmas tree farm with a cup of cocoa and peppermint in hand, wearing stocking caps and red noses) and my apartment gets the second-hand fake tree with the crooked top.

This time, though, we had an adventure planned. So here is the 4th day of Christmas step-by-step tutorial of how to choose your own Christmas tree in Oregon.

{how to choose a christmas tree}

Step one: Start out with a great idea. For example: you're going to drive your Jeep into the snowy foothills of the majestic Mount Hood with some friends, pick up a permit from the ranger's station and strap on snowshoes to hike through snowy hills to find the perfect tree. There will be some sort of golden light shining down when you find it, much like National Lampoon's Christmas Vacation. Proceed to get really excited.

Step two: Plan to be on the road by 10 am, tops.

Step three: Leave at noon. Well, let's call it noon-thirty. Because you totally forgot about that crockpot dinner you were supposed to start an hour ago.

Step four: Get halfway to the mountain before you realize, shit. We live in Oregon. It's not 30 degrees and snowing... it's 50 degrees and pouring.

Step five: Pull up to the ranger station, pay $5 for a tree-cutting permit and ask where the best place to snowshoe for a Christmas tree would be. Try not to look annoyed when the ranger laughs and says, "snowshoe?"

Step six: Find some snowshoe trails further up the mountain. Park the jeep and trade all your heavy winter clothes for your raincoat and umbrella. Leave the snowshoes in the car. Bring the saw. Leave the gun. Take the cannoli.

Step seven: Discover that snowshoeing trails are not so pretty when they don't require snowshoes. Ponder between your choices: do you take the "snowbunny" trail, or the "white-way" trail?

Step eight: Trek through the rain and wander further into the woods, filling your senses with the smell of fir trees.

Step nine: Pick out the perfect tree. This may take some time, as finding the perfect tree is not something to be taken lightly. It should be a fir tree, preferably. You must be sure to examine it from every angle, measure the height carefully, test the branches for their "ornament-holding" abilities, and decide whether the curve in the trunk is adorable or distracting. Once you find a tree that matches these qualities, cut it down close to the base and name it "Douglas."

Step ten: Realize you're pretty far into the woods and have forgotten a sled to cart your tree back to your car. Give your party members a quick lesson on the proper techniques to move a heavy object: the fireman's carry, the drag-and-pull, the make-shift sled, the backpack carry, the one-person lift, the two-person lift, or the ever-popular cheerleader pyramid. Don't forget to lift with the knees.

Step eleven: Make it back to your car without getting lost. Congratulations! Now you have to find a way to get multiple trees strapped to the top of your Jeep and get home before the sun sets at the ripe ol' hour of 2 pm. You have twenty minutes. Ready.... go.

Step twelve: Oh, and I forgot to mention that Northern firs are super prickly. You may not have noticed (because you were wearing gloves before) but all of a sudden, trying to move your Christmas tree is like wrestling with a cactus. Joke that "you may be soaking wet and your hands are bleeding, but you're soooo happy!" Sing a Christmas carol. "O Christmas Tree" might be appropriate at this point in time, but I won't tell if you change the lyrics to something involving rum.

Step thirteen: Safely make it home from the mountain without your trees going through the back of someone's windshield. Bring your tree into the house (don't forget to wear your gloves!) and spend thirty minutes tediously twisting the giant bolts of your tree stand into the trunk so that it stands up straight. Step back and admire your new decor, and get some bandaids for your hands.

Step fourteen: Realize that despite the deviation from your original plan, it was a pretty awesome day. Especially that part with the cheerleader pyramid.