Red Velvet Crinkle Cookies

How was your Valentine's Day? Tanner and I went out to a fancy restaurant for dinner, whereupon we realized that we are not fancy restaurant people. The waiter kept recommending different kinds of wines, expensive dishes, and sweet desserts, but we stuck with our glasses of water and pasta dishes and decided that next year we're going to find a quaint country diner, order a big apple pie, and call it even.

When we got home I decided to make a batch of our own dessert in the spirit of the holiday: red velvet crinkle cookies. Tanner admitted that he doesn't like red velvet, but I was set on making red heart cookies, so I went for it, anyway.

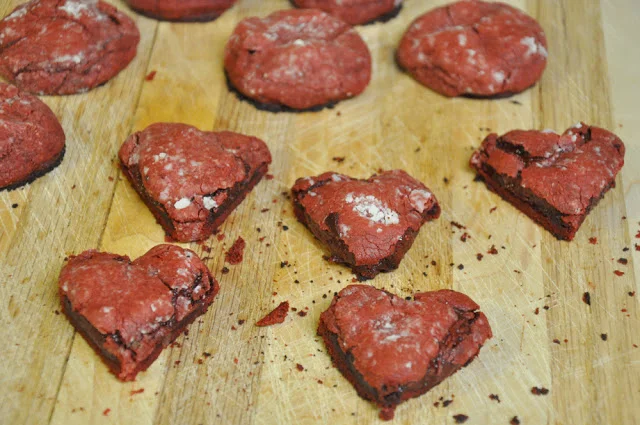
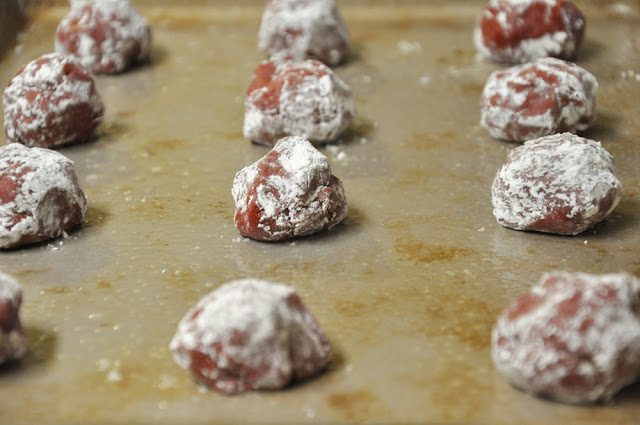
{red velvet crinkle cookies}

Ingredients:

1 box red velvet cake mix
2 tablespoons all-purpose flour
2 large eggs
1/2 cup canola oil
1 teaspoon vanilla extract
Powdered sugar, for rolling the cookies
Heart shaped cookie cutter

Preheat oven to 350 degrees F. Line a large baking sheet with parchment paper. I was out of parchment paper and simply sprayed the pan with oil, which I later learned was not a good life choice.

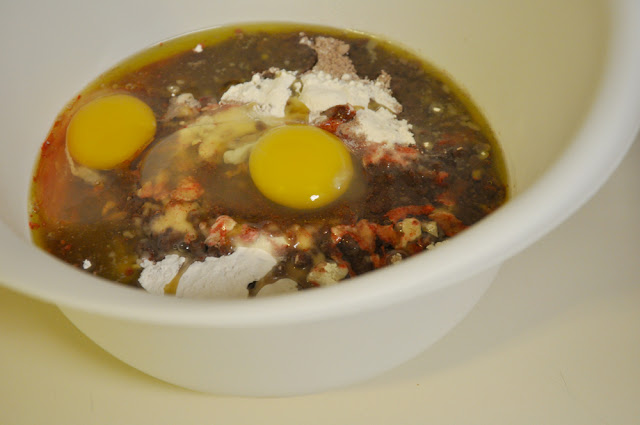
In a large bowl, combine cake mix, flour, eggs, oil and vanilla extract. Mix until smooth.

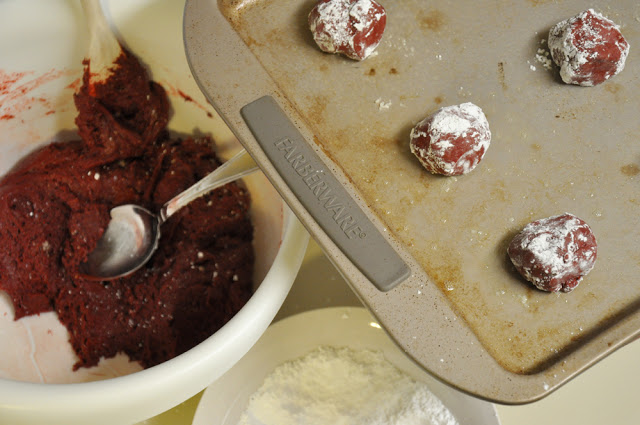
Scoop a spoonful of cookie dough and form into a ball. Roll the ball in powdered sugar until fully coated. Place cookie dough balls on prepared baking sheet. Bake for 10 minutes, or until edges are set and cookies begin to crack.

Or so the recipe says. It was at this point that I realized that only 6 minutes had passed and the house started to smell like burnt cookie. I yanked the pan out of the oven at the same time the fire alarm went off. Unfortunately, my poor cookies were still gooey on top and almost black on the bottom. I scraped them off the pan and put them on a cutting board to cool, rather dejected.

I let them sit for a minute and then decided to cut them into hearts, anyway. I didn't have a heart cookie cutter, so I used a knife to chop off the edges into rough heart-like shapes. (Poor little burnt lop-sided heart cookies...)

As it turns out, Tanner tasted one of them and decided that his new favorite flavor is gooey-burnt red velvet.  So we shared our plate of Charlie Brown heart cookies and decided that next year I'll buy some parchment paper.

Bean Burgers

I adore a good veggie burger. However, I have the hardest time making them. There comes a day at least once a year when I get completely energized by the idea of crafting my own, and then half an hour later I remember why it's been a year since my last attempt.

Granted, they always taste pretty good, but it's so hard to make them stick together like good burgers should. The photos in my cook book look perfect and uniformly grilled and delicious, resting on a toasted bun, but when I attempt the same recipe, I end up with stir fry.

This particular bean burger recipe started out as another failed attempt at the perfect patty, but once I cheated and dumped a bunch of flour in the recipe, I actually managed to turn out a burger that held together. Success!

{bean burgers}

1 can black beans
2 cups mixed veggies
1 egg
Flour, as needed
Spices, to taste
Vegetable oil

First chop up a good mixture of fresh vegetables of your liking. I used red and green peppers, zucchini, and red onion.

Saute vegetables in a small amount of vegetable oil on medium heat.

In the meantime, drain can of beans and dump into a food processor or blender. Add the egg. When the vegetables are done sauteing, add them to the blender and blend away.

By this point you probably have a nice black-and-blue-looking mixture that doesn't look at all appetizing. Gross, right? Trust me, it gets better. Add any spices you'd like (the burgers tend to be bland without them) and enough flour so that the mixture isn't too runny.

Using a ladle, spoon dollops of the vegetable bean mixture onto your hot saucepan in a little oil. Let it get good and cooked on one side before attempting to flip it over, otherwise your burger will break apart (trust me). The more flour you added, the easier it is to flip them.

Cook both sides until slightly charred. Put on a bun with all your favorite accessories and enjoy! (By the way, these burgers go great with my baked french fries!)

Apple Juice Chicken

For those of you who have heard me lament about this in the past, Tanner is a really picky eater. I have a better sense of what feeding small children will be like, because he abhors anything green, leafy, vegetable-y, or healthy, in general. I finally got him to adore a fruit smoothie that we make, but it's often hard to deter him from the usual fried-chicken-grilled-cheese-pizza-meat-and-fries meals he's used to eating. (Though I love him, anyway. :))

While my mom and sister were in town over the holidays, my mom whipped up a meal that she's been making for as long as I can remember. It's a very simple recipe for chicken that is healthy and delicious, and the best part? Tanner loves it! We're just one step closer to adding veggies to that plate of chicken, folks...

Here's the recipe for all you cooks out there who like a tasty meal in less than half an hour :)

{apple juice chicken}

*A note: I didn't actually measure out a lot of this, but I figured adding measurements would be more scientific. Keep in mind these are estimates, and it's not really that hard to make up the amounts as you go along, or tailor it for whatever company you have coming over.

3-4 boneless, skinless chicken breasts
3 cups corn flakes (we just bought a generic cereal brand)
1 cup parmesan
1 can frozen apple juice concentrate
1 egg
1 cup milk
2 tbsp butter

Preheat oven to 350. Place two tablespoons of butter in a large pan and place in oven until it has melted, coating the bottom of the pan.

Put the corn flakes into a ziplock bag and use a rolling pin to crunch them up into small bits.

Add the parmesan and mix it together in a bowl.

Mix the egg and the milk together and dip your chicken breasts into the mix. Then roll them in the corn flake bowl until they are fully coated.

Place chicken into the buttered pan and cook at 350 degrees for 15-20 minutes.

Pull chicken out and place a large spoonful of apple juice concentrate on top of each chicken breast. Cook for another 5-10 minutes until chicken is fully cooked and the juices run clear.

Serve and enjoy! The fruity taste is just delicious!

Winter Adventures

Our first winter storm of the season hit the Pacific Northwest last week, and it dumped 98 inches of snow on the mountain. Though snow on Mt. Hood means rain in Portland, it's hard not to be excited about a fresh layer of powder to play in, only one hour away...

In anticipation of getting up to the slopes on my next day off, here's a recap of this season's ski trips via photo journaling: