DIY: Holiday Wreath

After scouring the internet for a good wreath-crafting idea, I was at a loss to find something cheap, easy, festive, and made of materials I wouldn't have to go out and buy. Having no luck, I decided to try something innovative and see how it turned out.

Fortunately, the outcome was pretty spiffy, so I'm sharing my fun little project with you!

{diy christmas wreath}

All you need for this tutorial are some old t-shirts, a wire clothes hanger, and a bow.

First bend the wire hanger into a circle. Don't worry if it's not perfect; when the wreath is finished, it smooths over any small deficiencies. Just get it as close as you can.

Next, cut your old t-shirts into strips about 2" wide and 4" long. I didn't measure my strips, I just eyeballed them. They don't all have to be perfect, but if you make the strips too long, the wreath will end up a little droopy.

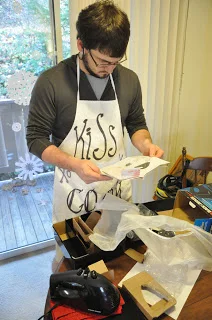
T-shirt color will have a fun effect on what kind of wreath you make. Tanner has an abundance of old white t-shirts, so that became the theme of my decoration. After making one, though, I'm inspired to try it with only red and green shirts, or with a whole collection of fun colors!

Tie the t-shirt strips in single knots along the wire hanger. Make sure you tighten them as much as you can to make the knots as small as possible. This will allow you to put more strips on the hanger and thus make the wreath more "full" looking.

I also alternated the direction in which I tied my knots (right over left, then left over right), otherwise the knots started to angle in the same direction.

Continue tying strips and pushing them together as tightly as you can all along the wire hanger until it is full.

From here you can choose how you want your wreath to look. You can either leave your wreath like this, or you can twist and turn each knot to give your wreath a "tousled" look. I tried mine both ways and liked it better with the tassels hanging the same direction.

Put a bow on your wreath and hang it up for all to enjoy!

DIY: Christmas Ornament

If you remember making snowflakes in third grade, you may also remember creating these paper ornaments. They're simple to put together and look quite fancy when you're done! The best part is experimenting with all kinds of paper, colors and sizes to create the perfect ornament for your tree.

{diy paper ball ornament}

Needed:
Craft paper, Christmas cards, or cardstock
A circle punch or a circle template
Rubber cement (or any other kind of craft glue)
Ribbon

First, cut out 20 circles of equal size from holiday paper, scrap paper, or my favorite: old Christmas cards! Sadly, I don't have any scrap Christmas cards this year, so I used the colored craft paper that I had leftover in my shop. I made 2" circles, but depending on the size of the ornament you want, I recommend anything from 1" up.

Cutting 20 circles is way more tedious without a paper punch. However, if you're like me and don't have one, save yourself a headache and find a mug in your cupboard that has a decent sized base. All my mugs were too big, so I used a small 2" candle to trace.

Now, draw out an equal-sided triangle on a piece of paper, for a template to go inside your circles. If you're making a 2" ornament, the sides of your triangle should be 1 3/4". If you're making a different sized ornament and don't know how to find the size of your triangle, try this trick: cut out a spare circle that's the same size as your others. Fold it in half. Fold one of the edges up to the center fold. This fold line should be the length of your triangle sides.

Cut out your triangle template and use it to trace lines inside your circles.

Fold your circles into triangles using your template.

Now paste the folded corners together with rubber cement or craft glue: you should make two "caps" of five circles pasted together into a ring. This will be the top and bottom of your ornament. Then paste the remaining ten in a line. This will be the center of your ornament. Refer to the photo below for the setup.

To make the ornament tie, before you paste your final circle in the cap, string a piece of ribbon through the hole and tie a knot at the end to keep it from slipping out. Paste the final circle together to secure the ribbon.

Paste the other "cap" together in a similar fashion. Take your line of ten circles and paste them together end-to-end to form a large loop.

Paste the caps on the top and bottom of your center loop, and there you have it! A lovely ornament to decorate your tree. If you want to get really creative, you can line the edges with puff paint, add glitter, sequins, or any other kind of "bling" to make it fun. Enjoy!

Christmas Cookies

Today, instead of spending five minutes and $3 picking up a box of sugar cookies from the grocery store, I spent three hours and $15 to make my own. Totally worth it? I think so. Not to say that the homemade kind is any less terrible for you than the store bought kind... in fact, I think you should pretend not to see the ingredients and just remind yourself that indulging is part of the holidays.

Without further ado... how to make adorable, delectable Christmas sugar cookies.

{Christmas cookies}

Ingredients:

1 cup butter
2 cups sugar
2 eggs
3 tsp vanilla
1 cup sour cream
1 tsp salt
2 tsp baking soda
5 1/2 cups flour

Cream the butter and sugar together in an electric mixer. I like call my mixer "Tanner."  He was doing this by hand to begin with, but then remembered his mom gave him an electric mixer a while back, and the prospect of using a power tool to make cookies was too enticing to ignore. Needless to say, things got creamed in quite a hurry after that.

Add eggs and vanilla to sugar/butter mixture. Add sour cream. Combine flour, baking soda and salt in a separate bowl and then add to butter mixture. It will be really sticky at this point and hard to shape, so chilling the dough is essential.

If you have wax paper, divide your dough into four parts and refrigerate. Ideally, you should chill it overnight, but I was impatient and wanted to make cookies, so I only chilled it for an hour.

In the meantime, you can create the frosting for the cookies.

Buttercream frosting ingredients:
1/2 cup butter
4 cups powdered sugar
2 tsp vanilla extract
1/4 cup milk
Food coloring
Sprinkles

This actually makes a lot of frosting, so if you're not a frosting person, you might consider cutting back the recipe. We piled it on and still had a lot left over.

In a mixing bowl, cream butter. Beat in sugar and vanilla until crumbly. Gradually add milk until you get the desired consistency. A good power mixer helps make it smooth and fluffy.

Tanner and I divided the frosting into two bowls and added in red and green food coloring to make it more Christmassy. Unfortunately, instead of a nice forest green and burgundy, we ended up with mint and pink. Perhaps we should have made these for Easter, instead...

When the dough has chilled, roll it out on a floured surface (flour is important... even after chilling it will still be sticky) about 1/8" - 1/4" thick, depending on how big and soft you want your cookies. Use cookie cutters to make shapes, or, if you're like me and do not own cookie cutters, cut them by hand. Here's a tip: don't get fancy. Cutting out Christmas trees by hand was about the fanciest thing I could do without it looking like a big blob.

(P.S.- check out those awesome snowflakes on the window behind Tanner!)

Put the cookies on a greased pan and bake 5-7 minutes at 375 degrees. It's important to keep an eye on them -- my oven is hot so I only baked them five minutes. They won't look cooked, but if you cook them much longer, the edges will go brown, the bottoms will be burnt, and you'll have a very crispy cookie. Five minutes was just enough for the bottoms to be brown and the tops to still be white.

Let cool before you put frosting on them. Tanner and I got overzealous and iced them right away, and it melted all over everything. Both messy and delicious. Do yourself a favor and wait until they're completely cool. Add sprinkles to make the cookies look more like decorated Christmas trees!

Depending on the thickness of your cookies, this recipe yields about 30-50. I actually was able to make 55 cookies, but mine were fairly small, only 2" tall. This will be the brunt of your work, though, is spending hours rolling out dough, cutting dough, and cooking/ icing cookies. It helps if you eat a bunch in the process. :) Enjoy!

I'm glad there's a holiday party at my work this week, because there's no way I can keep 50 cookies in the household without eating them all and gaining 20 pounds in the process.

Ski Holiday

We skied on Thanksgiving, and it was wonderful. On the east coast, a ski trip is a highly-planned and highly-anticipated affair, the result of months of planning, culminating into one all-too-short-and-expensive getaway weekend.

Now that we live in Oregon, a "ski trip" is only a short hour drive away, and can be repeated as often as we please throughout the season... I'm still getting used to that. How novel! And so, not two days later from our first trip to the slopes, we had another day off work and arrived there again, still a bit sore and still a lot excited. This is hardly routine, yet. This is still new and fresh and delightful. Skiing whenever we want? On every day off if we choose?

Yes, please.

The weather was warm, the sky was sunny, and we kept screaming over and over at the snowy, gorgeous mountain, we can't believe we live here!