DIY: Homemade Envelope Liners

Since I'm out of paper, I spent a lot of last evening doing some materials research for cardmaking. After a few hours of searching and referencing and comparing, I discovered one thing: materials are expensive. No matter how you slice it, a pack of 80 lb cardstock, envelopes and sleeves cost some serious dough. And not only that, but the shipping is just crazy. I was thinking standard shipping rates range anywhere from $5-$8, right? Nope, try $15-20. Apparently a seven pound pack of cardstock ain't cheap.

That's an investment, right there, so I was trying to cut my losses and order all from one place, but that didn't seem to help much, either. Even when I ordered multiple things, the shipping kept inching up in price.

The other issue I encountered was that I wanted to order materials that were 100% recycled or biodegradable. I'm keenly interested in having an earth-friendly shop (a little ironic for someone who makes paper goods...) so this took top-priority for me. It required a little more research, but I did manage to order a good batch of eco-friendly supplies that will hopefully last me a while. Now I just have to wait for them to arrive, and I can start creating in earnest!

In the meantime, I'm going to show everyone how to make fun envelope liners for cards.

Why make cute cards if you don't have something cute to put them in?

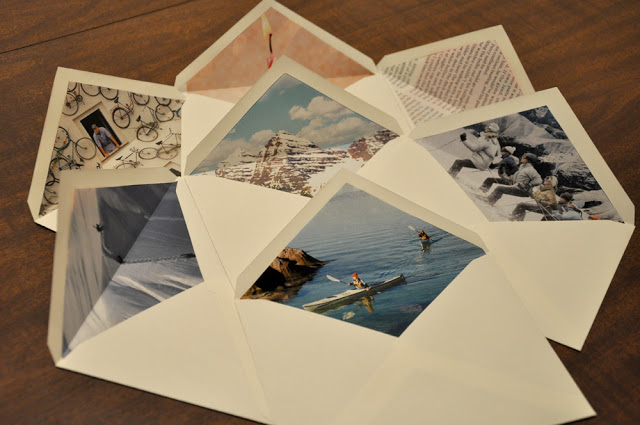
As noted above, I didn't want to spend more money or waste more paper by making these liners, so I upcycled some old magazines and used the photos I liked to create new envelopes. Here's the tutorial for you!

{diy: homemade envelope liners}

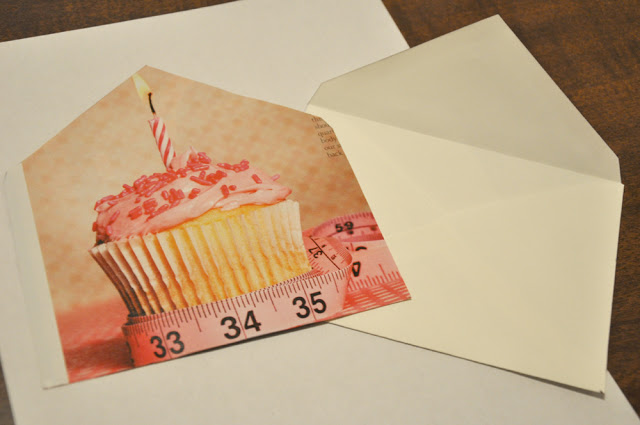
First, choose a photo with a good print and trace the envelope onto the magazine page:

Next, cut off about 3/4" from the bottom of your traced design. (This will ensure that the liner sits lower than the sticky top of the envelope flap):

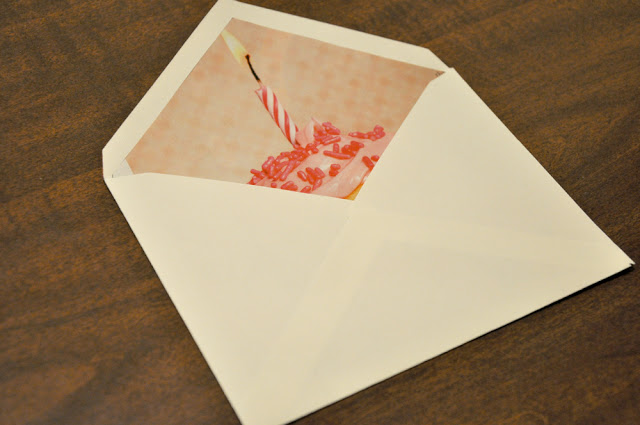
Trim the sides of the template, as well, so that it slides into the envelope easier. Position the liner where you would like it, close to the sticky envelope flap, but not overlapping:

Fold down the envelope flap with the liner inside to make a crease. Apply glue to the top flap to adhere to the envelope:

Ta-da! You have a fun, new, colorful envelope. Test out different magazine photos (or old maps, book pages, or scrap paper) for different looks. I've been using old Outdoor and Backpacker magazines, so my photos are all mountains and kayakers! Love it. :)

P.S. - for my next batch I'm going to use darker envelopes. Because the magazine pages are so thin, the back of them shows through. Having a darker envelope will help give it a cleaner look!

Blue Skies and Tulip Festivals

Yesterday was an abnormally beautiful day in Portland. The sun was shining, the birds were singing, the sky was a perfect shade of blue... it was a cliché kind of day for everywhere but the Pacific Northwest. And it could not have arrived a moment too soon.

I was practically panicking trying to figure out what to do with myself and the gorgeous weather. I had a few errands to run (I found a shopping center with a Crate and Barrel and a Container Store and an Anthropologie... dangerous. More on that later), but once those were over I had a whole afternoon and no plans. Usually on my last day of work for the week I scout out my guide books and pick the perfect activities for my day off so I don't waste a minute, but last night I was so beat that I passed out at 10:00pm and completely forgot to do my homework.

After rifling through pages and not being able to decide on anything (it was already 1:30 and I was afraid of trying out a hike that was too far away) I remembered that the Woodburn Annual Tulip Festival was going on this month, and it seemed like a perfect day to be out and taking photos of flowers.

The drive there was 45 minutes, but divine, because it took me through acres of vineyards, open farmland, and stretches of green with a beautiful mountain backdrop the whole way. It was all I could do not to stop the car every five minutes and take photos. But I restrained myself and instead spent the afternoon taking photos of the rows and rows of tulips that were coming into full bloom.

As for the rest, I will let the photos speak for themselves.

Angel's Rest

I feel like this blog is slowly turning into a trail guide... not that that's a bad thing, but it certainly wasn't my intent when I began it! Maybe one of these days (when I'm not exploring and taking craploads of pictures) I'll start posting more artsy-things on here and finally get that etsy shop up and running.

In the meantime, here's another trail guide for you to enjoy. ;)

Yesterday I had the day off work and spent some time researching another new trail to explore. It was raining when I woke up, so I slept in a bit, only to discover that when I finally got out of bed at the late ol' hour of 9:00am, the sky was blue and the sun was shining!

In a frenzy, I threw on some hiking clothes (no jeans and ski coat for me, this time!), packed my daypack with water, snacks, and a camera, and hit the road bound for Angel's Rest.

Alas, in the half-hour it took me to get the gorge, the rain started up again and for a while I sat brooding in my car at the trailhead, wondering if I should continue onward. There were a bunch of other hikers there already, and they were much better prepared than I was, by the looks of it. They all had on warm hats, gloves, several layers and rain gear, not to mention loaded packs and trekking poles. It was like an REI catalog out there. In my haste this morning, I unwittingly packed for an east coast hike and completely neglected to remember that I am no longer in an east coast climate.

Things I was missing:

Gaiters. (It's damn muddy all the time with the rain. How did I not remember that from my last hike?) A rain cover for my pack. (I have one for my big pack, but my daypack? Oh, no.) A more rain-proof camera case. (I brought the little one for weight's sake and forgot the one with the raincover at home.) Warm clothes. (I had on long underwear and a rain coat, but it was much chillier than expected...) Trekking poles. (Downhill is not my friend.)

In a twist of fate, the rain suddenly stopped ten minutes after I arrived, and I jumped at the chance to start up Angel's Rest, anyway. Rated as a "moderate" hike in my trail guide, I soon learned that "moderate" meant 2,000 feet of elevation change in two miles. Huffing and puffing and realizing how out of shape I was as I hiked up the trail, I made myself go onward because, well, it was Oregon and the trail was still beautiful despite its ruggedness.

As I climbed higher, the lush greenery dropped behind and tantalizing views of the Columbia River Gorge spread out below me. An hour and a half later I was standing at the top of a granite outcropping, the sun shining, and the whole of the gorge laid out at my feet. The weary hike was well worth the result, and I took a moment to have a mini-picnic and take some photos before descending again. I might have stayed longer, but my fingers were turning blue and -- wouldn't you know it -- it was hailing. We finally get a blue sky, sun and just a few wayward clouds, and it hails. Oregon is so weird.

Here's the view from Angel's Rest... quite aptly named, I might add.

Eagle Creek

After romping around Monday morning (or rather, walking serenely, as one tends to do in a Japanese garden...) I spent a little time shopping downtown and would have spent more time there, since it was so cute, but I drove my car and there is literally no parking downtown. Next time I plan on taking the fabulous public transportation that runs like San Francisco streetcars throughout the city.

But with more time to kill in the day I decided, on a whim, to do a little hike. A coworker of mine had mentioned Eagle Creek trail at work the other day, so I thought I'd give it a go, since the weather was relatively nice (meaning it was not currently raining, but still overcast). It took me about thirty minutes from downtown to get to the Columbia River Gorge, a place I know I'll be coming back for its amazing beauty.

Apparently I didn't know about the bear warnings, or the parks pass permit needed to park, or the fact that car break-ins happen often, but even if I did, I doubted it would have deterred me. Instead, I gaily hiked two miles in and back to see the famed Punchbowl Falls. It was a short hike, and an easy one, but each step was literally so much more beautiful than the last that I didn't want to turn around. But with the approach of darkness, and rain, and the possibility of my car not being there when I returned, I regretfully walked out again.

The trail itself winds its way up the gorge, literally on a ledge that is so narrow in parts that you have to hug the wall so you don't drop 250 feet into the gorge. Being that I'm afraid of heights, you'll believe me when I say the views were well worth the vertigo. I hugged the mossy walls, weeping with water, and even though it was wasn't raining, I found myself completely soaked by the end of the hike. I walked under waterfalls and through waterfalls and over waterfalls. Eagle Creek is a veritable wonderland of waterfalls. Every ten feet there's another gusher, even prettier than the last. It practically begs you to keep walking forward, because you know there will be another one just around the bend.

Alas, not knowing I was going on a hike, I wore the most useless outfit ever: jeans and a t-shirt. And a ski jacket. And my expensive camera that I desperately try not to get wet in this climate, but which seems to always get wet, anyway. I did have on hiking boots, so that's a plus. I may have looked like a drowned rat, but at least my feet were dry.

The photos I took hardly do the hike justice, but here they are for you to enjoy, anyway.